Deploy Flask Application on AWS EC2 and PostgreSQL
November 18, 2022
/
17 min read
--- views
•
--- comments
Introduction
This tutorial will show you how to deploy a simple Python Flask Application on AWS EC2 step by step.
Here is the link to the repository of the final project: https://github.com/arlenxuzj/flask-todos
This tutorial assumes that you have:
- A NEW AWS Account or An AWS Account CAN use Free Tier services - See Free Tier FAQs for more information.
- Git installed locally – See the installation guides for Git.
- Python version 3.7+ (Recommend 3.10+) installed locally – See the installation guides for OS X, Windows, and Linux.
This tutorial assumes that you know:
- Basic knowledge of Python.
- Basic knowledge of Flask.
Get Started
Download the Source Code
First, we need to download the source code from GitHub. Open Terminal and run the next line command:
$ git clone [email protected]:arlenxuzj/flask-todos.git
Open the Project Directory
$ cd flask-todos
Create Virtual Environment
Use the following commands to create and activate the virtual environment:
# Create a Python Virtual Environment called flask-app
$ python -m venv venv

# Activate flask-app Virtual Environment
$ source venv/bin/activate

# upgrade pip
$ pip install --upgrade pip
Install the Dependencies
$ pip install -r requirements.txt
Install PostgreSQL
For Windows users, you can check the download options here.
For Mac users, you can check the download options here.
We will use the Interactive installer by EDB, which is mentioned in the PostgreSQL Download Page to install PostgreSQL (works for both Windows and Mac users).
Run Application on Local Machine
Create Local PostgreSQL Database and Table
-
Open the pgAdmin 4 application downloaded with the PostgreSQL installer.
-
Right Click
Databases- SelectCreate- ClickDatabase....
-
Create a new database called flask-todos and
Save.
-
Right Click
flask-todos- ClickGenerate ERD.
-
You can design the ERD diagram and generate the SQL script for the database in this ERD Panel. Now click
Load Projectto load the ERD diagram from theflask-todos/model/todos.pgerdfile.
-
Click
Generate SQLand clickExecute/Refreshto create thetodostable in the new Query Panel.

-
Clear the content in the Query Panel, copy and paste the following SQL, and execute the SQL to insert some sample data:
INSERT INTO "public"."todos" ("id", "title", "completed") VALUES
(1, 'delectus aut autem', 'f'),
(2, 'quis ut nam facilis et officia qui', 'f'),
(3, 'fugiat veniam minus', 'f'),
(4, 'et porro tempora', 'f'),
(5, 'illo expedita consequatur quia in', 'f');
-
Go to
flask-todos - Schemas - public - Tables- Right Clicktodos- SelectView/Edit Data- ClickAll Rowsto view the data inserted.

Connect Database in Flask Application
-
Open
flask-todosin your favorite IDE, and open the.envfile. -
Open Terminal and run the following command to generate a Flask Secret key:
$ python -c 'import secrets; print(secrets.token_hex())' -
Copy the generated key and replace the
FLASK_SECRET_KEYfield with it in the.envfile. -
Replace the
DB_PASSWORDfields in the.envfile with your PostgreSQL postgres user password (NOT pgAdmin 4 master password).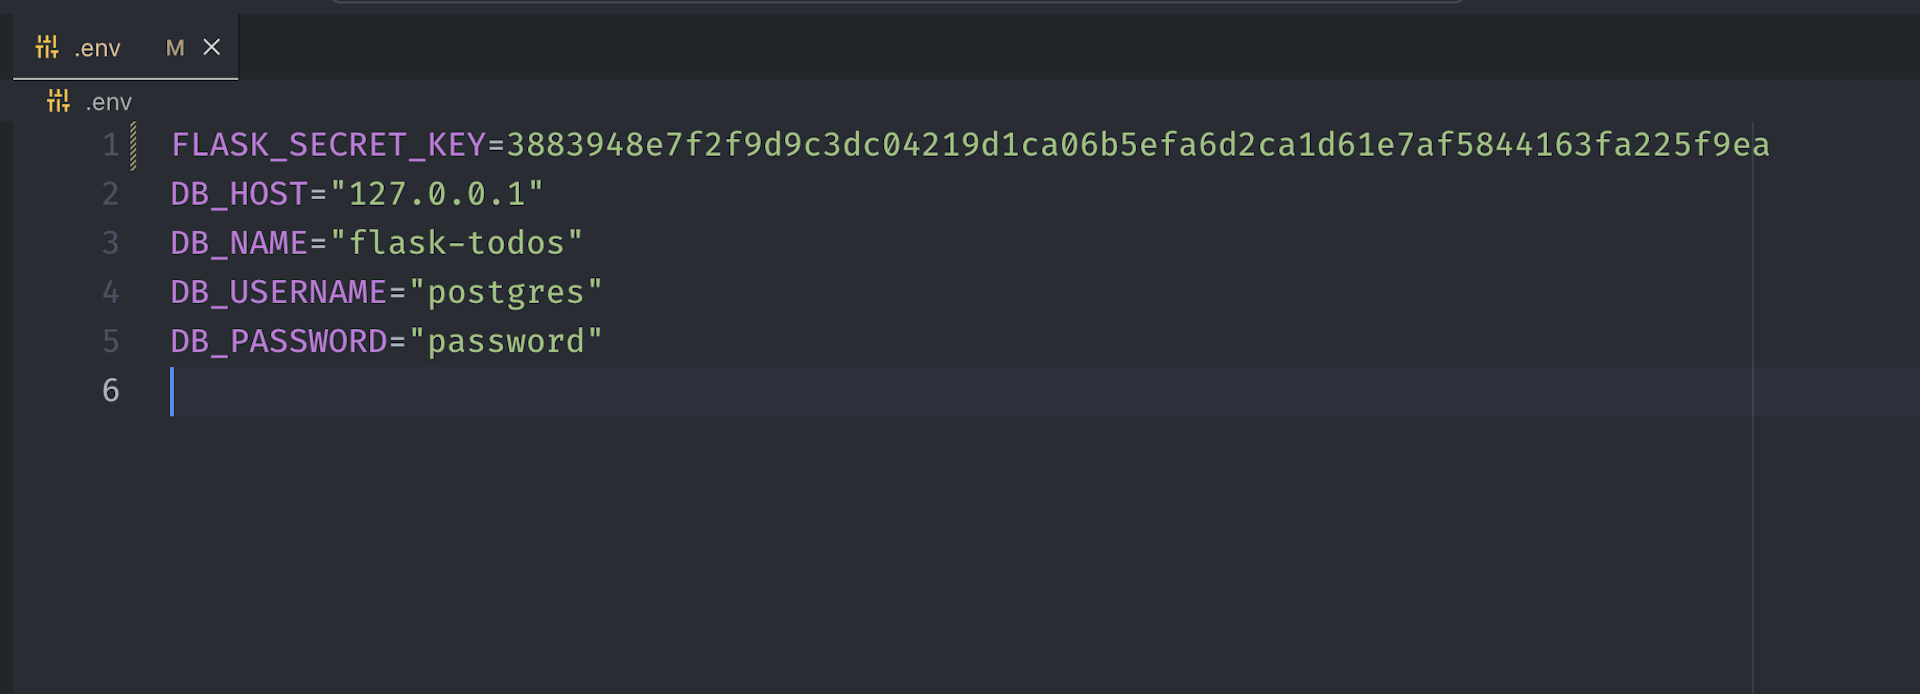
-
Run Application by the following command in the Terminal:
$ python src/app.py
Configure AWS EC2 Server
Create Server
-
In the AWS Home Page, type
EC2in the search bar and clickInstancesin theEC2area to enter the EC2 Instances Dashboard.
-
Click
Launch Instanceto create a new EC2 Instance.
-
Type
flask-todosin the Name field. Select Ubuntu Server 22.04 LTS (HVM), SSD Volume Type in the Application Machine Images (AMI) field. Select t2.micro in the Instance type field. Click.
-
Click
Create new key pairto create a new key pair. Typeflask-todosin the Key pair name field. ClickCreate Key Pairto download the key pair fileflask-todos.pem.

-
In
Network settings, selectCreate new security group. CheckAllow SSH trafficand ONLY allow SSH traffic from your IP address. CheckAllow HTTP trafficandAllow HTTPS traffic.
-
Click
Launch instanceon the right side of the page.
Connect to Server
-
Go back to the EC2 Instances Dashboard and Click the Instance ID to enter the Instance Details Page.
-
Copy the
Public IPv4 DNSaddress.
-
Run command in the Terminal to change the permission of the key pair file:
$ chmod 400 path_to_key_pair/flask-todos.pem -
Run command in the Terminal to connect to the server:
$ ssh -i path_to_key_pair/flask-todos.pem ubuntu@your-instance-public-ipv4-dns-address
Install Packages
Run the following commands step by step in the server:
$ sudo apt update

# Type `y` and press `Enter` to continue
$ sudo apt upgrade
After the update and upgrade, reboot your instance and reconnect to the server.
Next, run the following commands to install some packages:
# Type `y` and press `Enter` to continue
sudo apt install python3-pip python3-venv python3-dev libpq-dev

# Set python3 as default python
sudo ln -s /usr/bin/python3 /usr/local/bin/python

# Set pip3 as default pip
sudo ln -s /usr/bin/pip3 /usr/local/bin/pip
Check the location of python and pip:
$ which python
/usr/local/bin/python

$ which pip
/usr/local/bin/pip

$ python --version
Python 3.10.x # Python version should be 3.10+
Configure AWS PostgreSQL Server
Create Database
-
In the AWS Home Page, type
RDSin the search bar and clickDatabasesin theRDSarea to enter the RDS Databases Dashboard.
-
Click
Create databaseto create a new RDS Database.
-
Select
Standard create. SelectPostgreSQLin the engine type field. SelectPostgreSQL 14.5-R1in the engine version field. SelectFree tierin the Templates field.
-
Type
flask-todosin the DB instance identifier field. Keep the default value in the Master username field. Enter a password in the Master password field.
-
Select
General Purpose SSD (gp2)in the Storage type field. Modify the storage size to20GB. UncheckEnable storage autoscaling.
-
Select
Connect to an EC2 compute resourcein the Connectivity Section. Selectflask-todosEC2 Instance you created in the previous step in the EC2 instance field. SelectIPv4in the Network type field.
-
If you want to disable automated backups, uncheck
Enable automatic backupsin theAdditional configurationsection. -
Scroll down to the bottom of the page and click
Create database.
Create AWS PostgreSQL Database and Table
-
Go back to the RDS Databases Dashboard and click the DB identifier to enter the Database Instance Details Page. In the
Connectivity & securitysection, copy theEndpointaddress.
-
Open pgAdmin, Right Click
Servers- SelectRegister- ClickServer....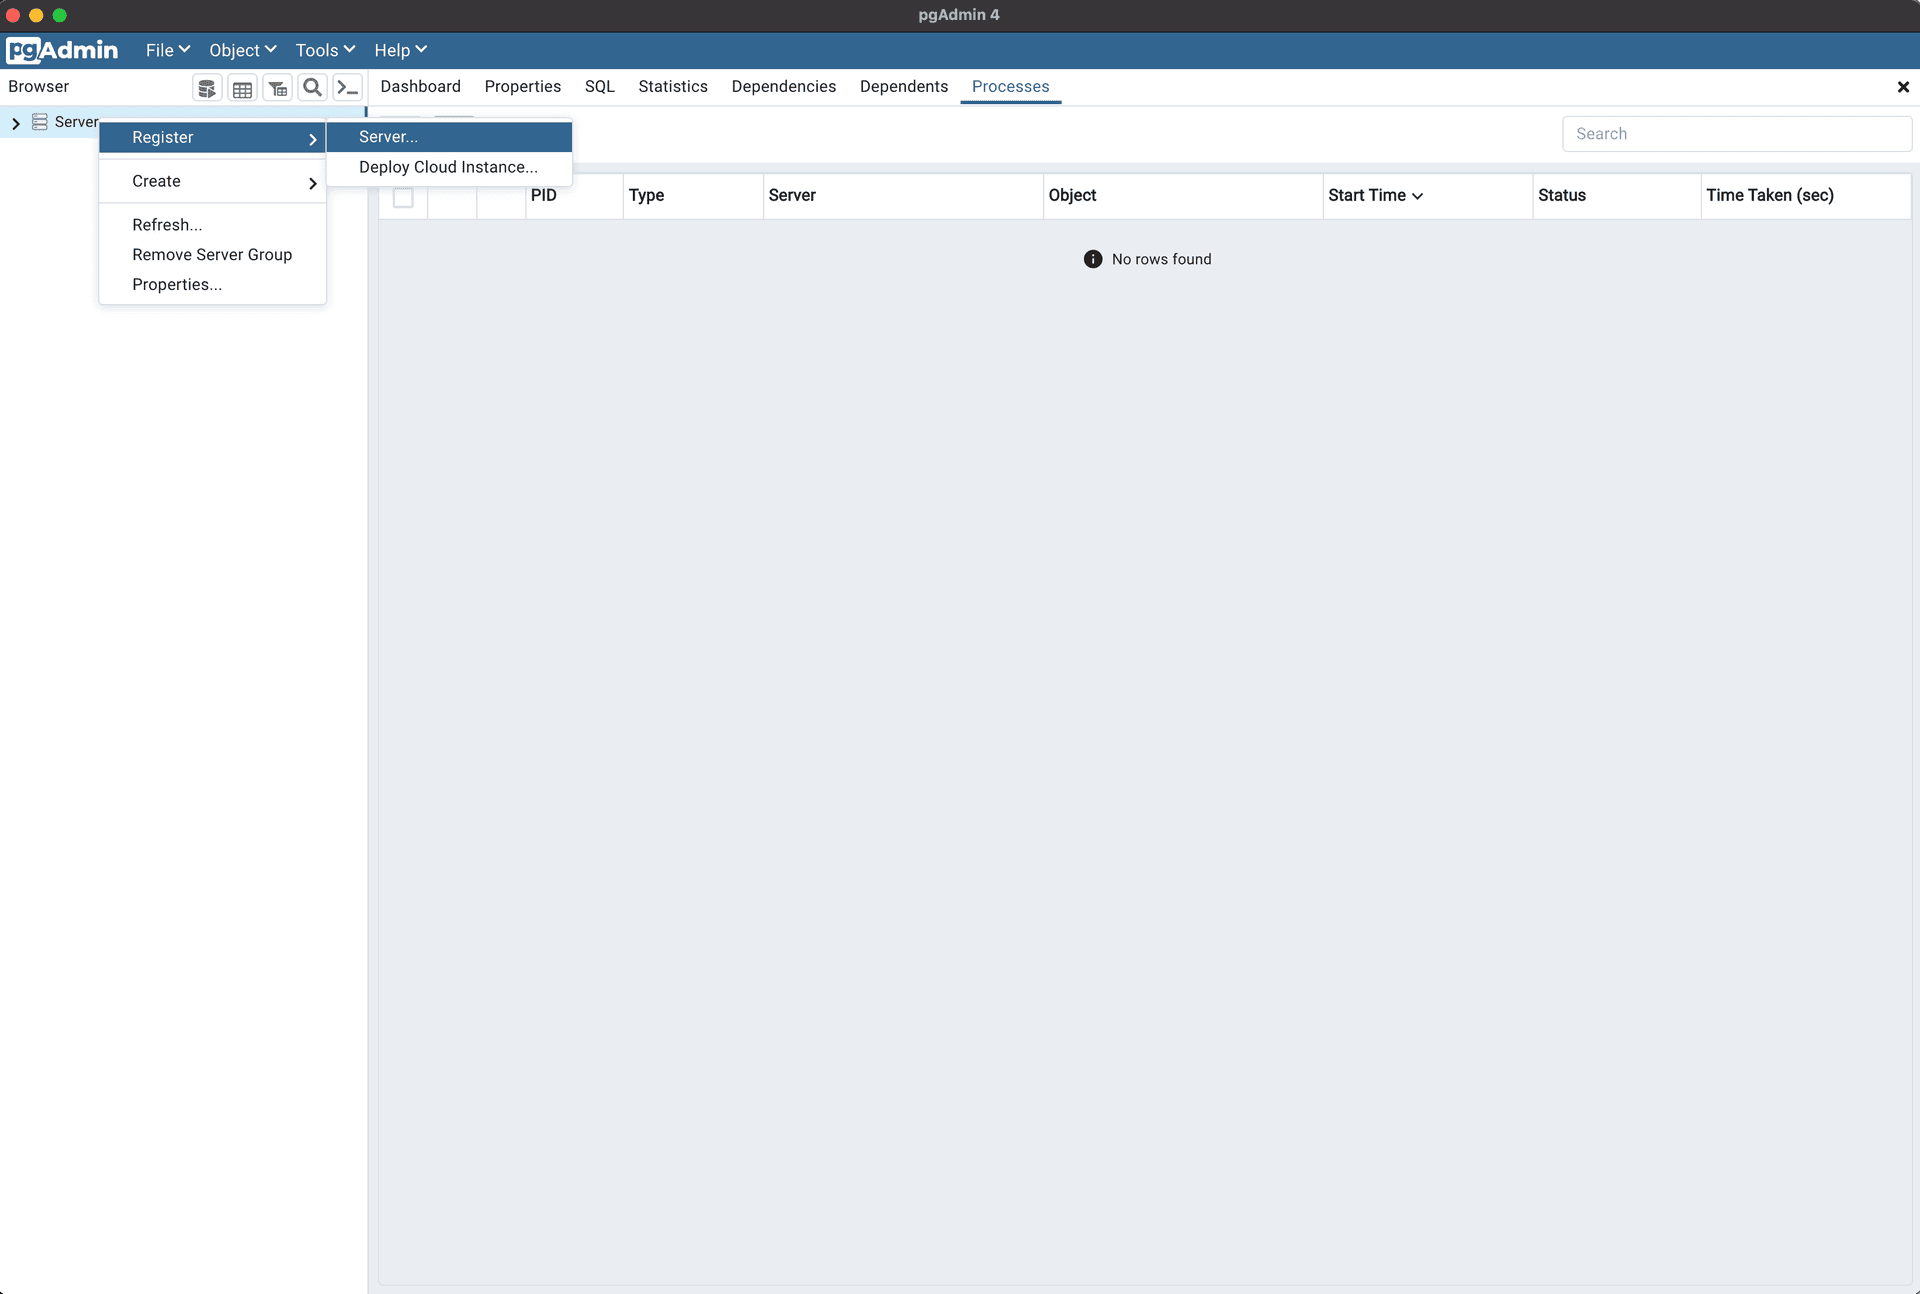
-
In the popup window, type
awsin the Name field in General tab.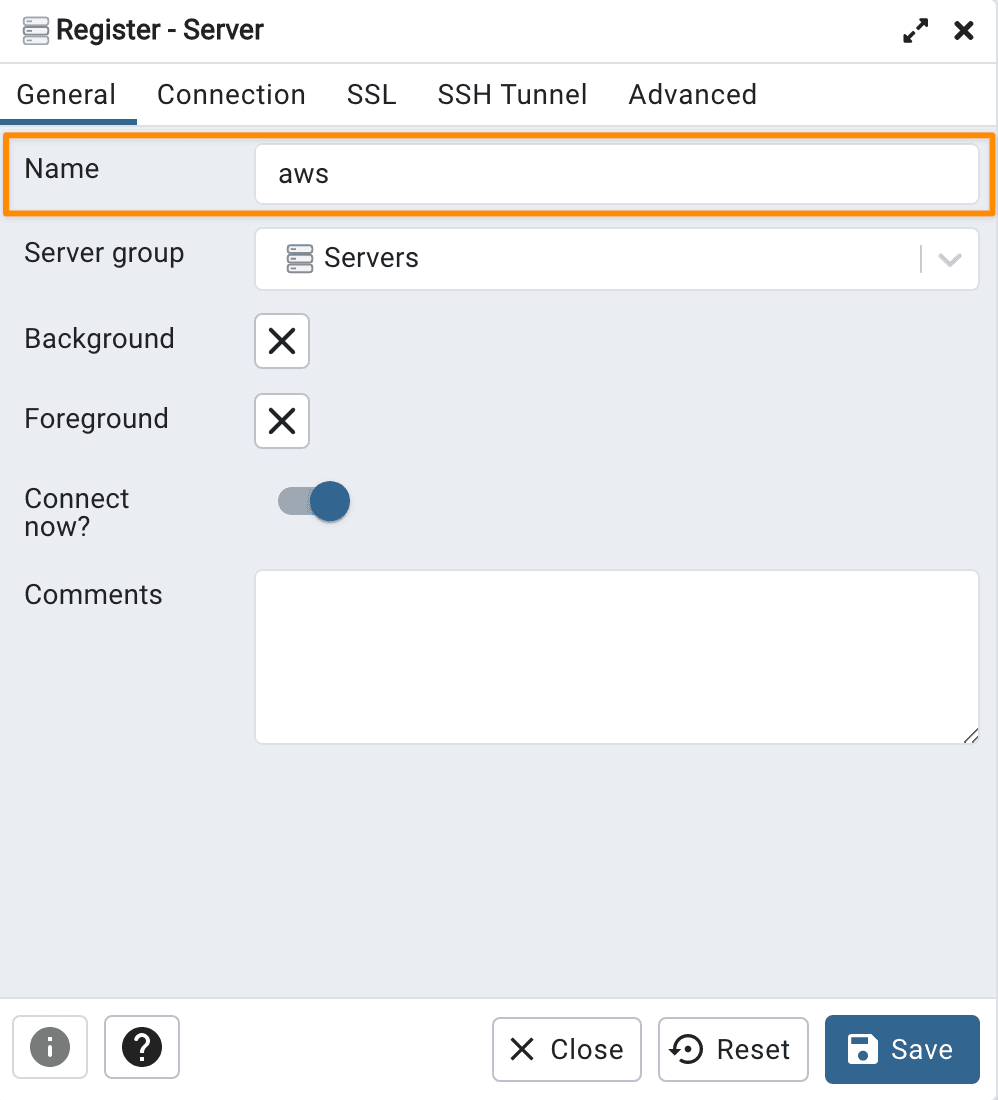
-
Copy and paste your database instance
Endpointaddress in the Host name/address field in Connection tab. Type the password you set for AWS database in the Password field in Connection tab.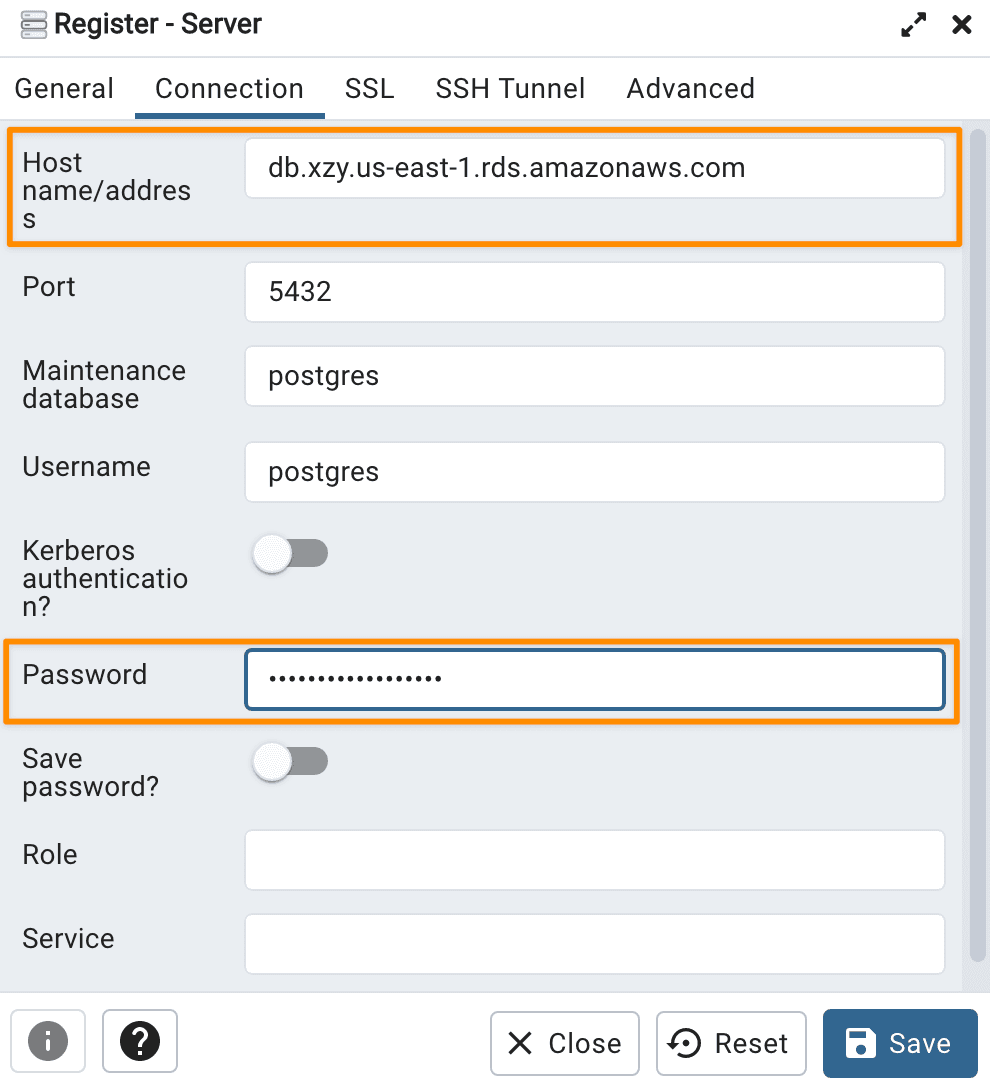
-
Copy and paste your AWS EC2
Public IPv4 DNSaddress in the Tunnel host field in SSH Tunnel tab. Typeubuntuin the Tunnel username field. SelectIdentity filein the Authentication field. ClickBrowseto select the key pair fileflask-todos.pem.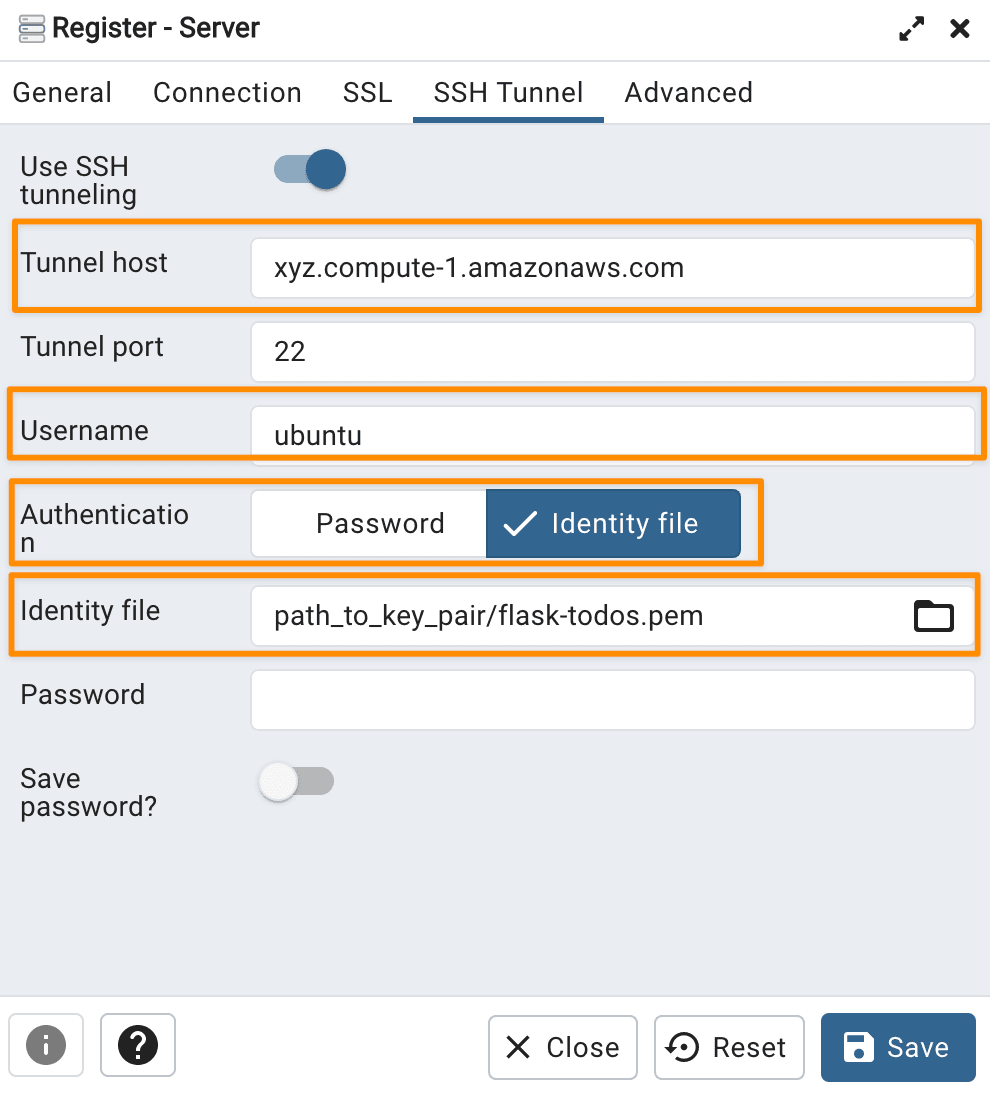
-
Click
Save. -
Follow the instructions in Create Local PostgreSQL Database and Table section to create database
flask-todosand tabletodos, and insert some sample dataset.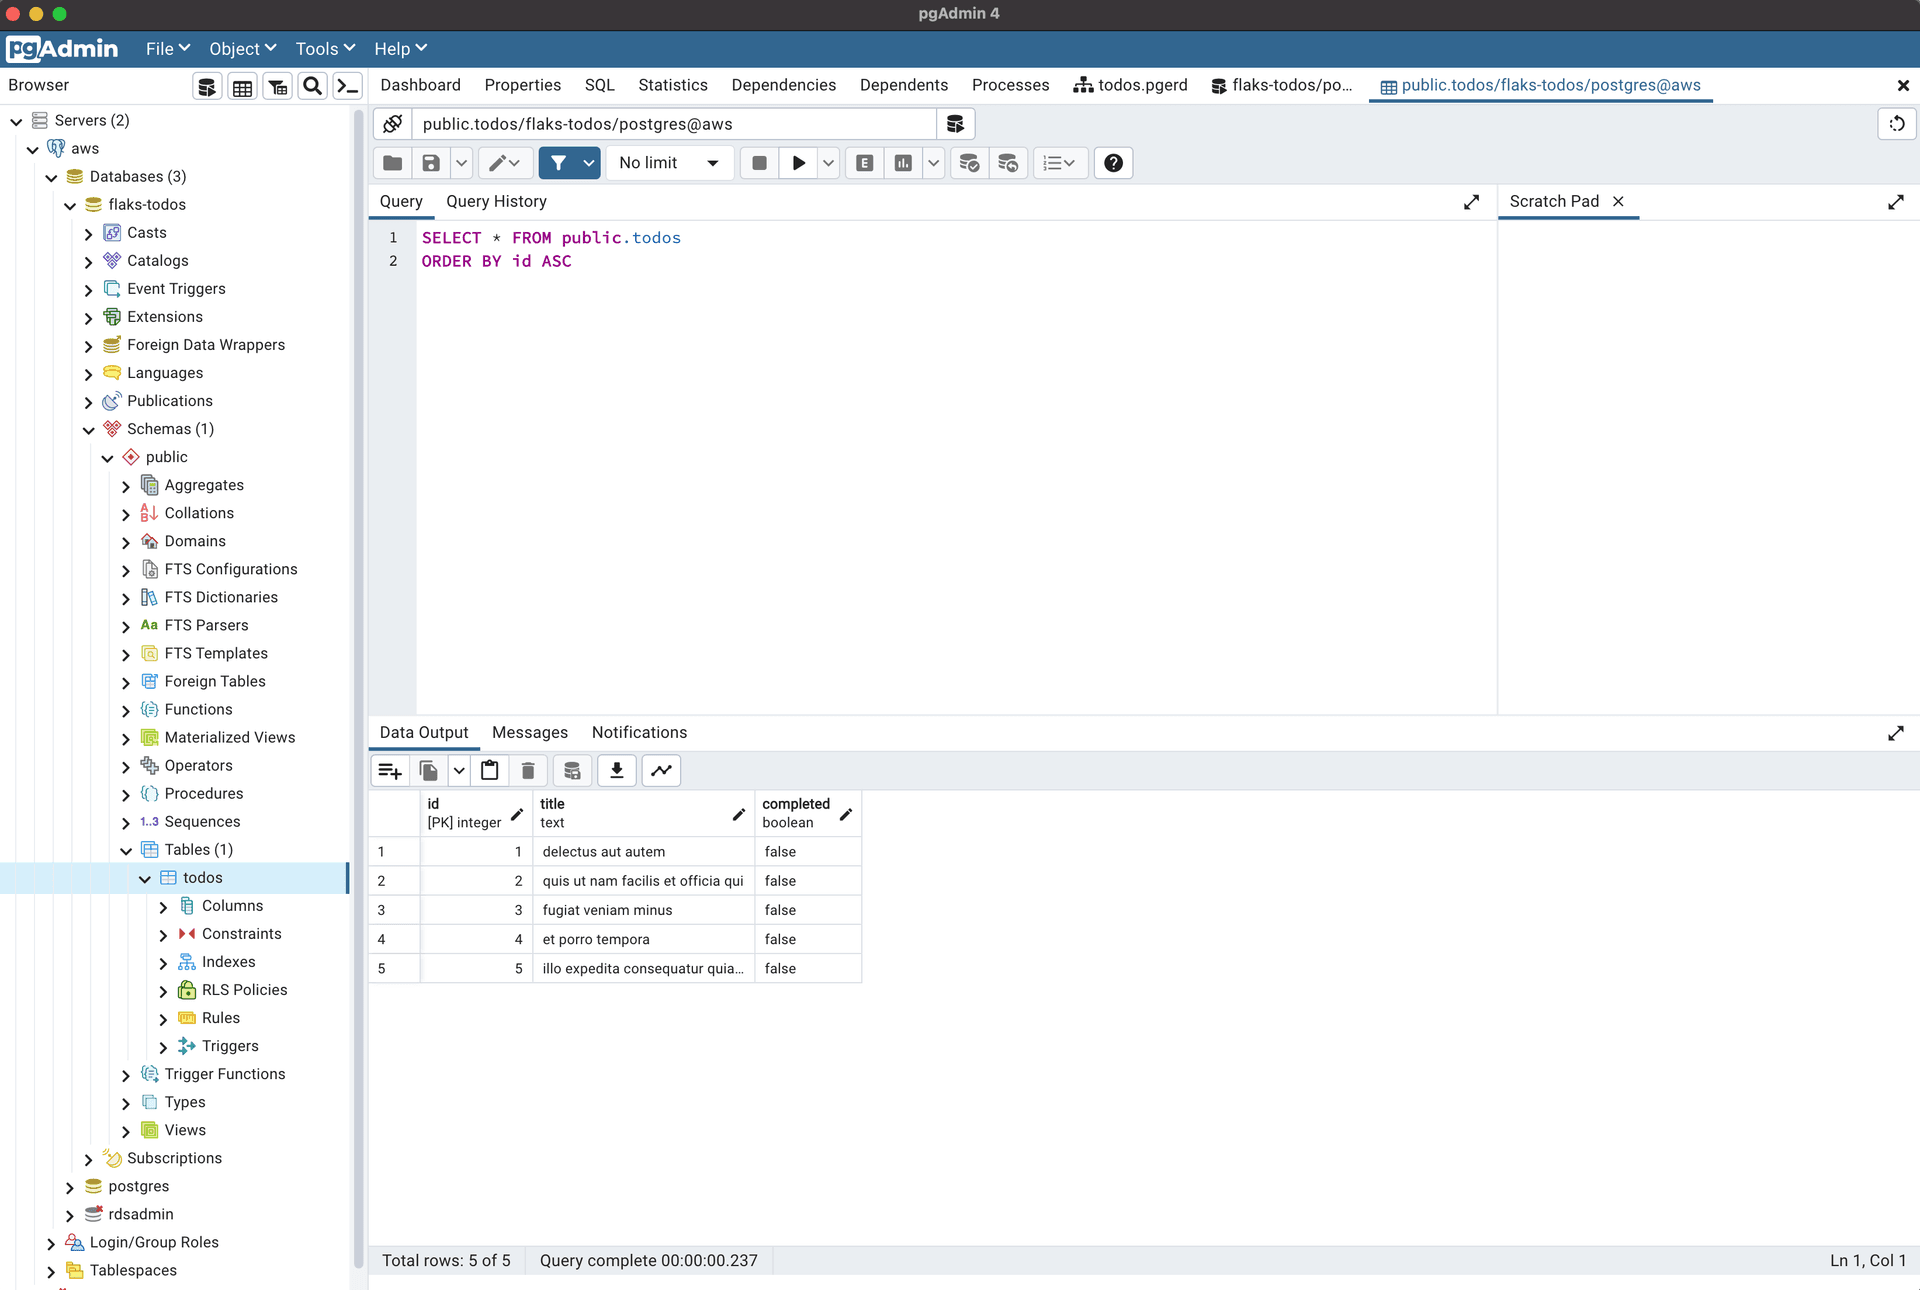
Run Application on Server
Connect Server via VS Code
-
Open VS Code and click the
Remote Explorericon on the left side of the page. -
Click
+to add a new SSH target. -
Type
ssh -i path_to_key_pair/flask-todos.pem ubuntu@your-instance-public-ipv4-dns-addressin theSSH Commandfield. PressEnterto connect to the server. -
Press
Enterto save the SSH target to the default SSH Configuration file.
-
Refresh the
Remote Explorerand you will see the AWS EC2 server and click->to connect to the server. SelectLinuxas the platform of the server.
-
Click
Open Folderin the Side Bar and clickOKto open the path/home/ubuntu.
-
Drag and Drop the
flask-todosfolder to the Side Bar of VS Code and confirm Copy Folder to upload the folder to the server.
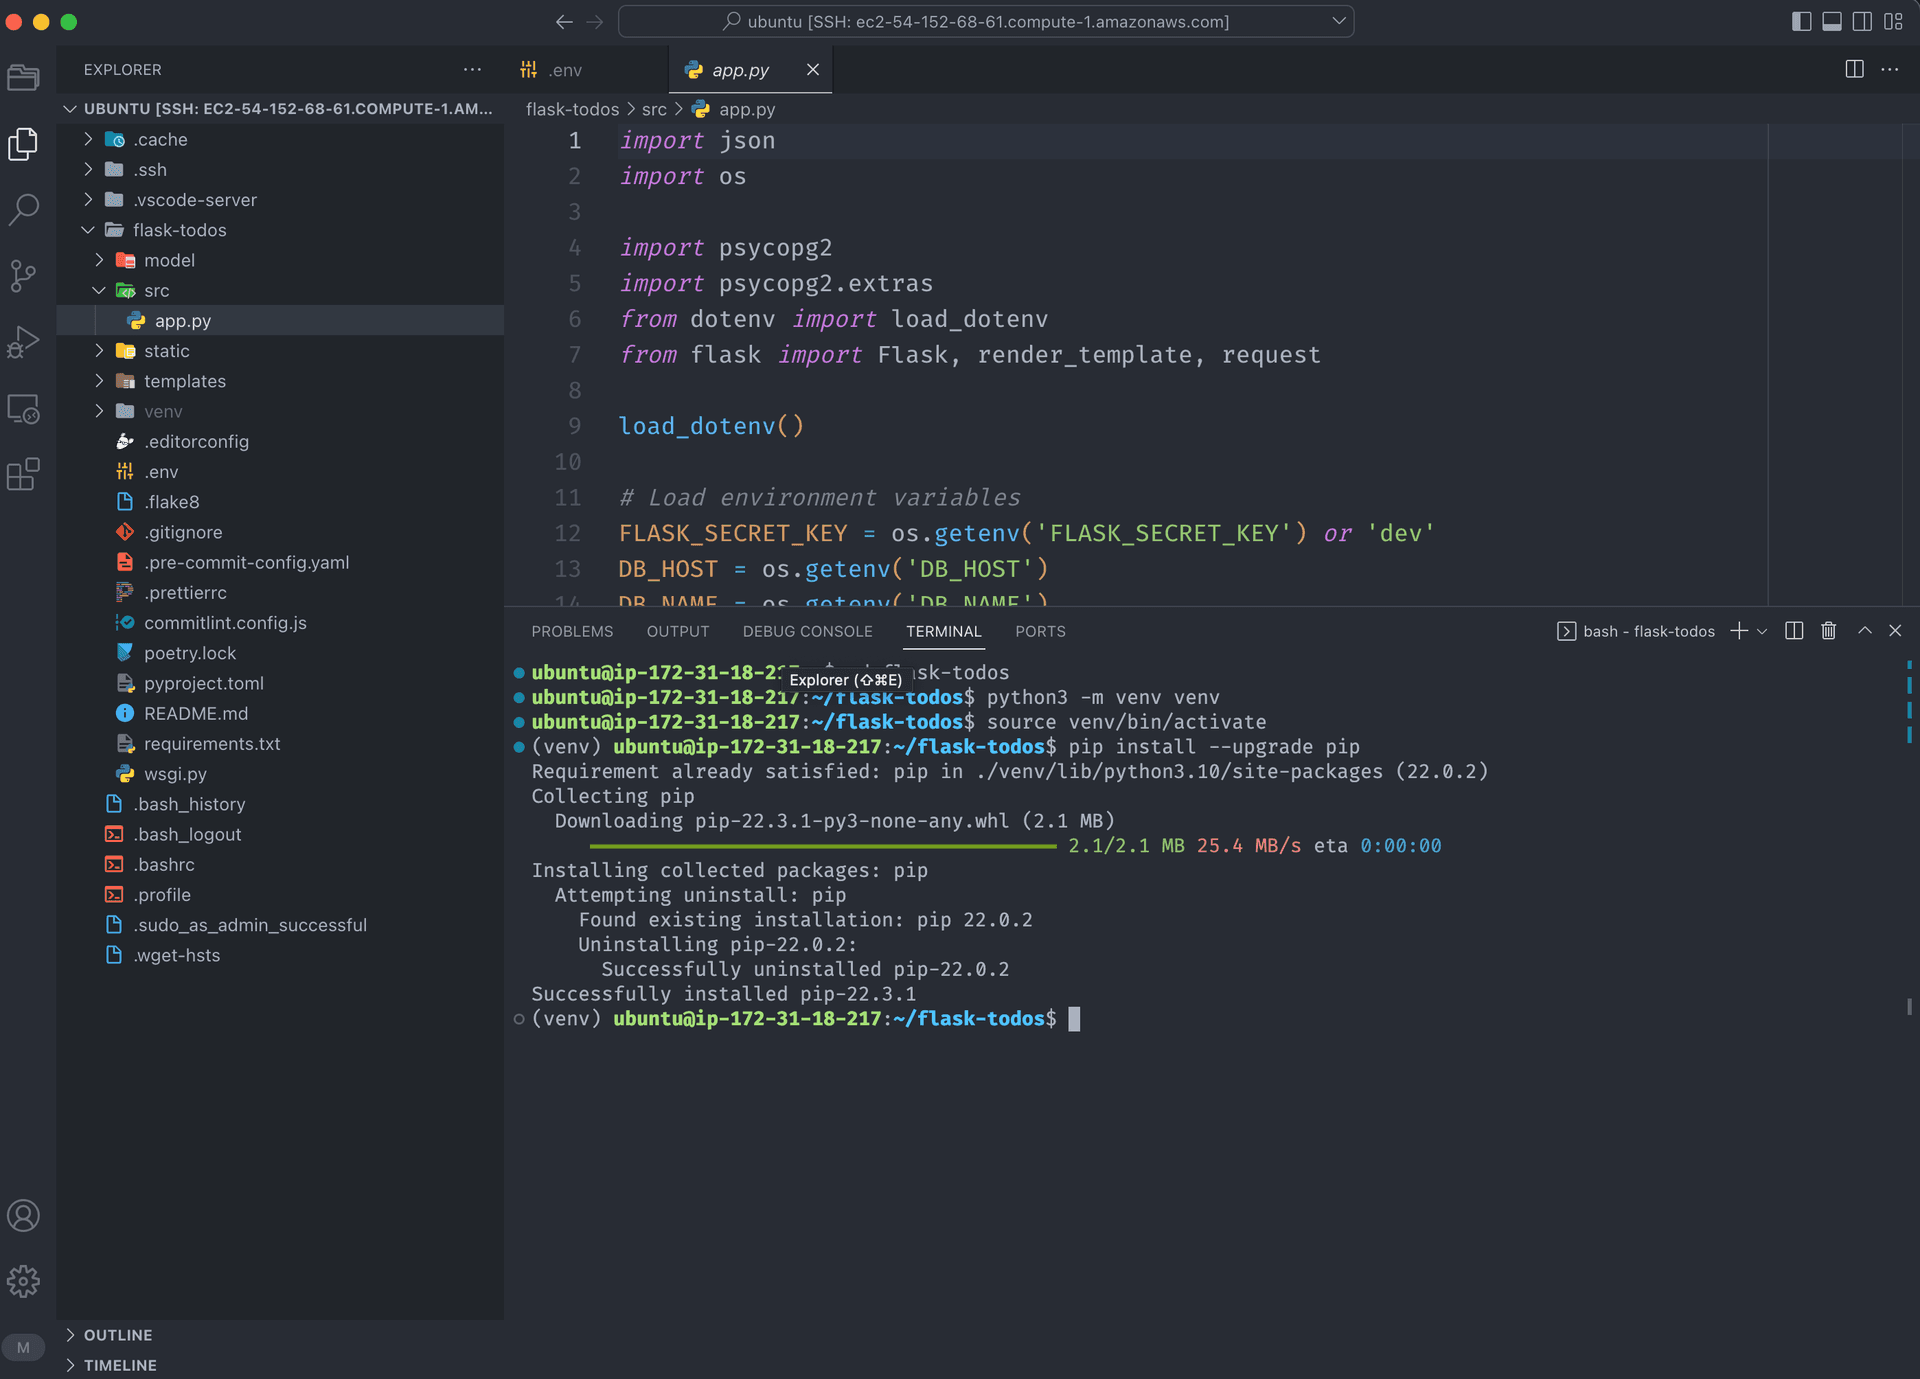
Create Virtual Environment on Server
Use the follow commands to create and activate the virtual environment:
# Open folder
$ cd flask-todos

# Create a Python Virtual Environment called flask-app
$ python3 -m venv venv

# Activate flask-app Virtual Environment
$ source venv/bin/activate

# upgrade pip
$ pip install --upgrade pip
Install the Dependencies
$ pip install -r requirements.txt
Edit .env File
- Open the
.envfile in VS Code. - Replace the
DB_HOSTvalue with your AWS database instanceEndpointaddress. - Replace the
DB_PASSWORDvalue with the password you set for AWS database. - (Optional) Replace the
FLASK_SECRET_KEYvalue if you like.
Run Application on Server in VS Code
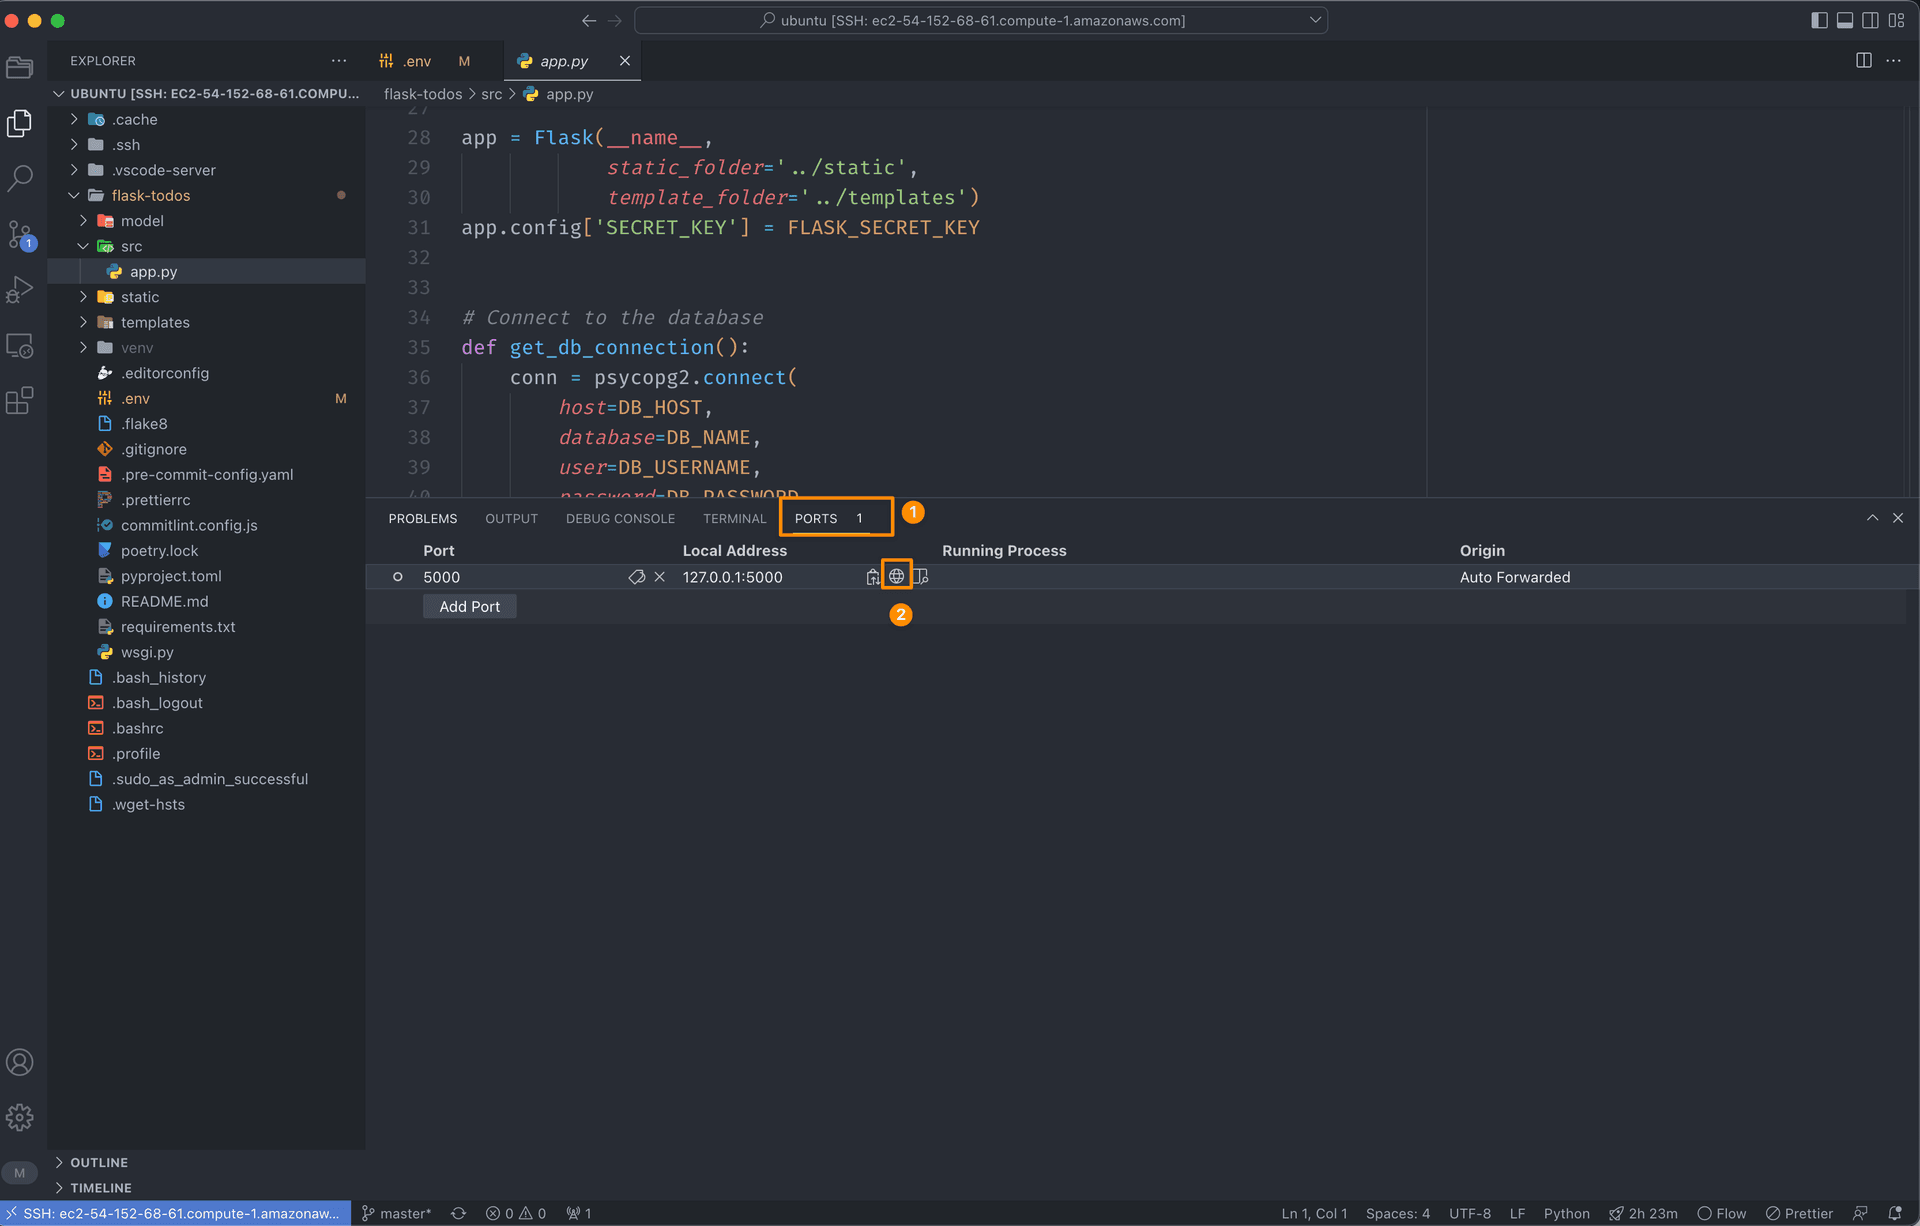
Run command python src/app.py in the integrated terminal in VS Code to start the application. Then,
you will see a popup window in the bottom-right corner of the VS Code. Click Open in Browser to open the application in the browser.
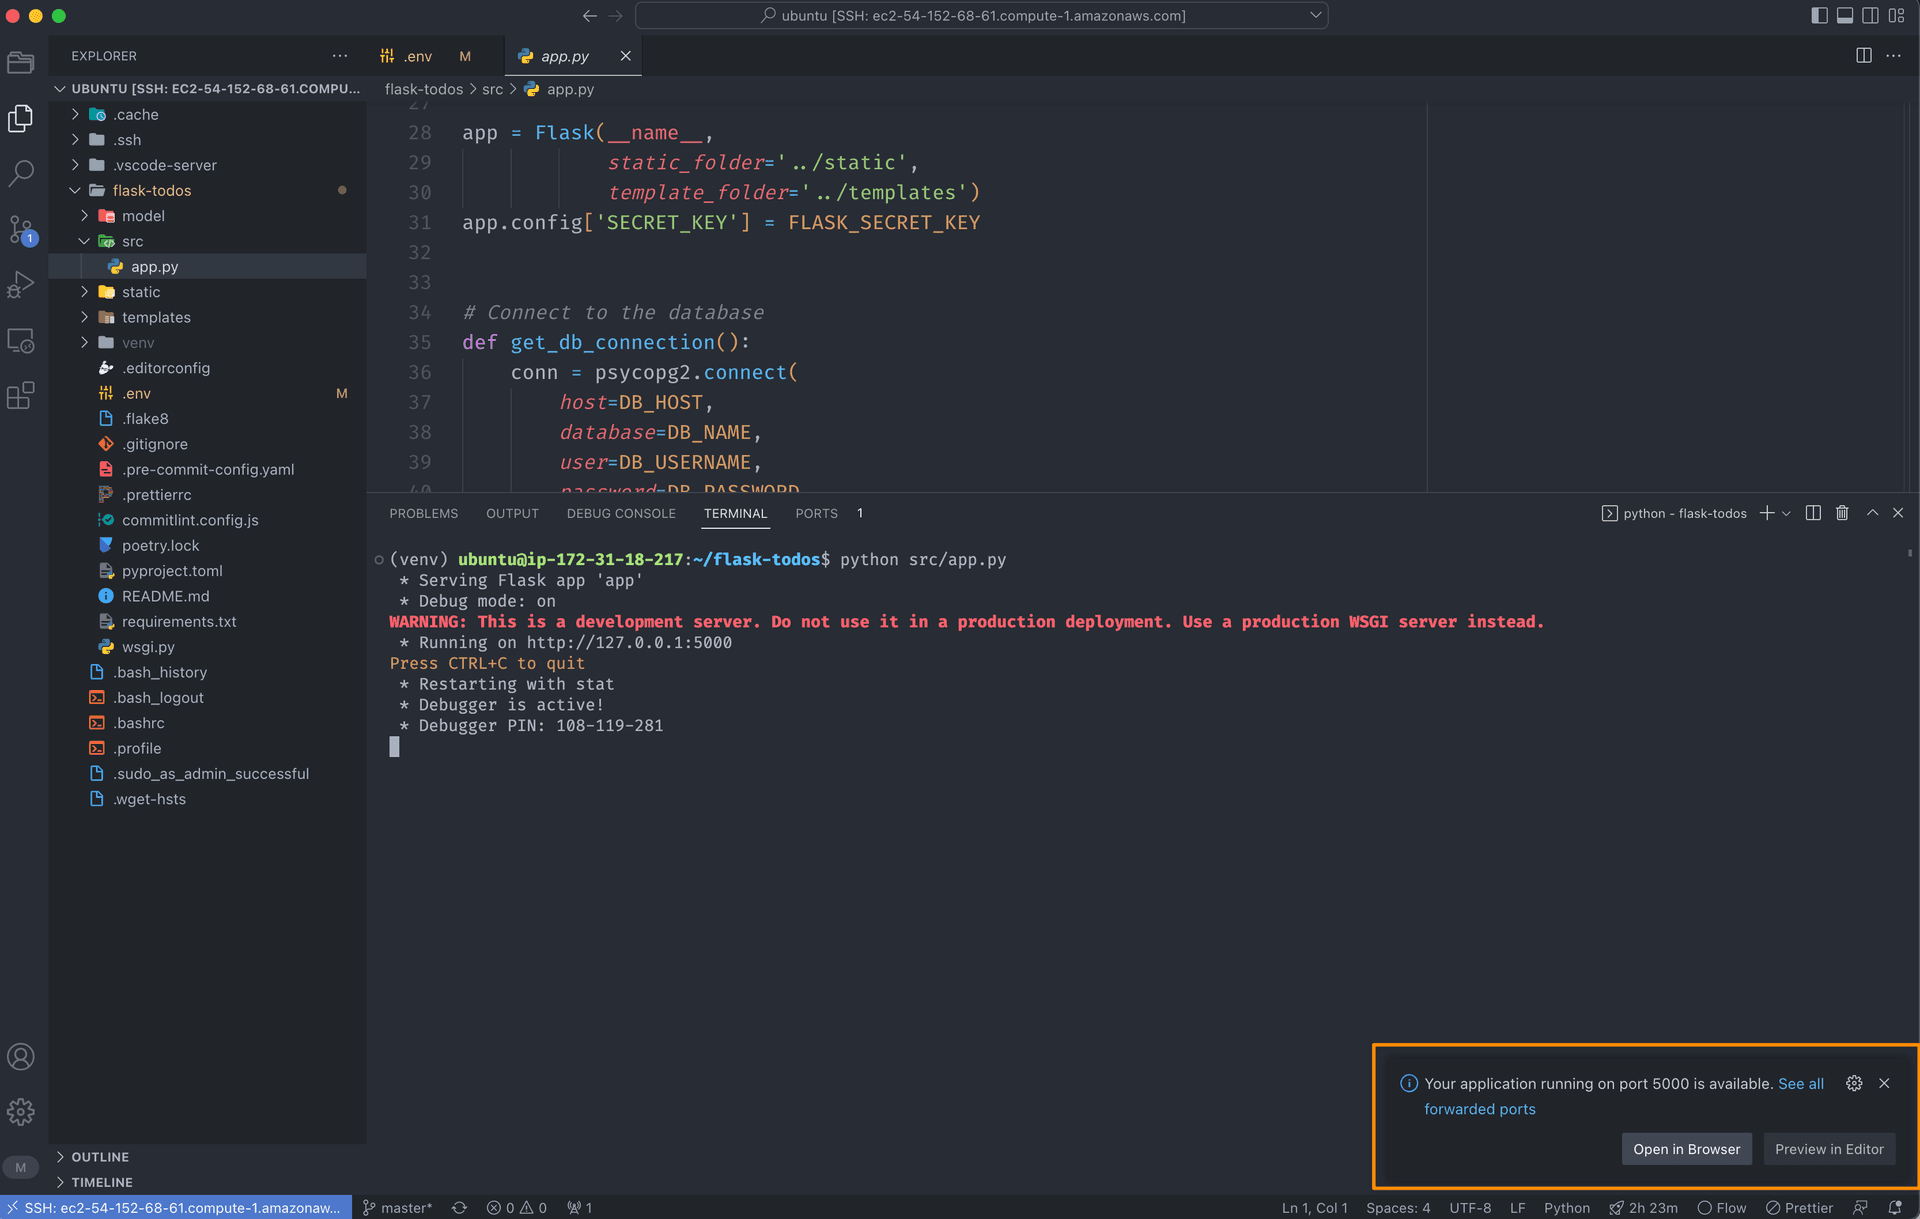
Or you can click PORTS tab in the integrated terminal and click Open in Browser icon to open the application in the browser.
Build a Nginx Web Server
Install Nginx
Run the following command to install Nginx:
# Type `y` and press `Enter` to continue
sudo apt-get install nginx
Nginx Configure
Then, run the following commands in the integrated terminal in VS Code:
# Create a new file called flask-todos
$ sudo touch /etc/nginx/sites-available/flask-todos

# Link the file to the sites-enabled directory
$ sudo ln -s /etc/nginx/sites-available/flask-todos /etc/nginx/sites-enabled

# Open the flask-todos file
$ code /etc/nginx/sites-available/flask-todos
Copy and paste the following content to the flask-todos file, replace the server_name value with your AWS EC2 Public IPv4 DNS address:
server {
	listen 80;
	listen [::];

	server_name xyz.compute-1.amazonaws.com;

	location / {
		proxy_pass http://127.0.0.1:8000;
		proxy_set_header X-Forwarded-For $proxy_add_x_forwarded_for;
		proxy_set_header X-Forwarded-Proto $scheme;
		proxy_set_header X-Forwarded-Host $host;
		proxy_set_header X-Forwarded-Prefix /;
		proxy_redirect off;
	}
}
This configuration file tells Nginx to listen on port 80 and forward all the requests to the localhost and port 8000. This is called reverse proxy.
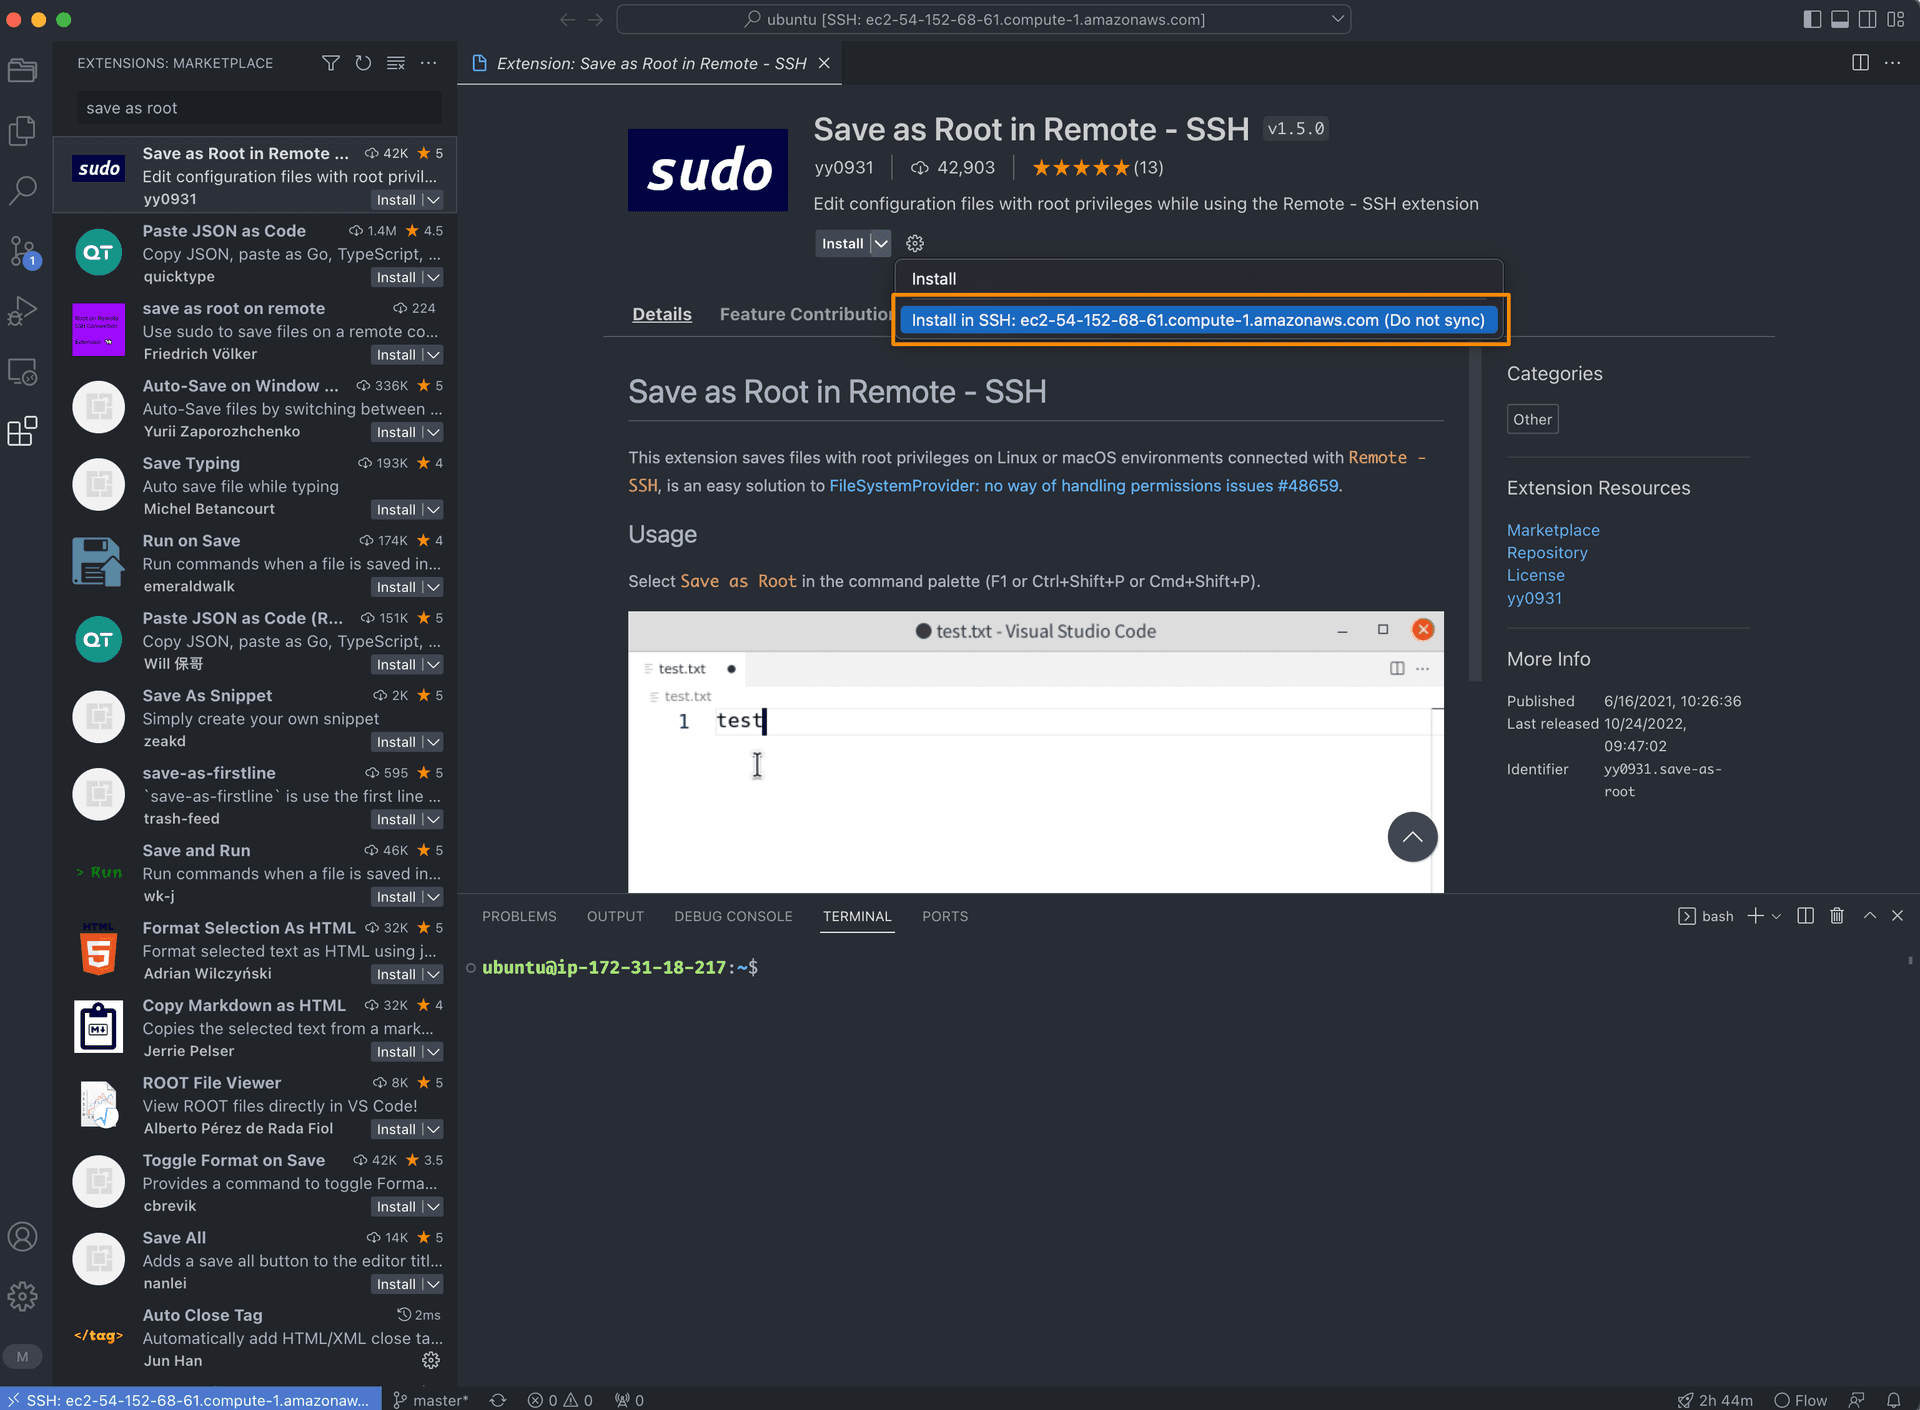
Then, open Command Palette by Shift+Command+P (Mac) / Ctrl+Shift+P (Windows/Linux) and type Save as Root to save the file as root

Next, run the following commands in the integrated terminal in VS Code to enable and restart the Nginx service:
# Make sure the configuration file is correct
$ sudo nginx -t

# Restart Nginx service
$ sudo systemctl restart nginx

# Check the status of Nginx service
$ sudo systemctl status nginx # should be active (running)

# Enable Nginx service to start up at boot
$ sudo systemctl enable nginx
Test the Connection
Run the command next line to start the Flask application:
# --workers 1: 1 worker process for handling requests
# --bind 127.0.0.1:8000: listen on localhost and port 8000
# You can simply use gunicorn wsgi:app to start the application
# gunicon will use the default number of workers and listen on localhost and port 8000
$ gunicorn wsgi:app --workers 1 --bind 127.0.0.1:8000
Make Sure you activate the virtual environment before you run the command.
Gunicore is a Python WSGI HTTP Server for UNIX. You can check here for more information.
wsgi is the python file in the flask-todos folder, you can view the content of the file by clicking the wsgi.py file in the Side Bar of VS Code. The reason we use wsgi.py instead of src/app.py is that we don't want to change the debug value in the src/app.py file to False every time we want to run the application in production.
Then, open the browser and copy and paste the Public IPv4 DNS address of your AWS EC2 instance into the address bar. You will see the application is running.
Persist the Application
Now, we need to make sure the application will be running even if we close the terminal. We can use systemd to manage the application.
First, run the next line command to deactivate the virtual environment:
$ deactivate
Then, run the following commands to create a new service file:
# Create a new file called flask-todos.service
$ sudo touch /etc/systemd/system/flask-todos.service

# Open the flask-todos.service file
$ code /etc/systemd/system/flask-todos.service
Option 1: TCP/IP Socket (Easier)
Copy and paste the following content to the flask-todos.service file:
[Unit]
Description=Flask Todos Web Application
After=network.target

[Service]
User=ubuntu
WorkingDirectory=/home/ubuntu/flask-todos
Environment="PATH=/home/ubuntu/flask-todos/venv/bin"
ExecStart=/home/ubuntu/flask-todos/venv/bin/gunicorn --workers 1 --bind 127.0.0.1:8000 wsgi:app

[Install]
WantedBy=multi-user.target
Then, run the following commands to start and enable the service:
# Start the service
$ sudo systemctl start flask-todos

# Check the status of the service
$ sudo systemctl status flask-todos # should be active (running)

# Enable the service to start up at boot
$ sudo systemctl enable flask-todos
That's it! Now, you can close the terminal, and the application will still be running.
Option 2: Unix Socket (More Secure and Higher Performance)
Copy and paste the following content to the flask-todos.service file:
[Unit]
Description=Flask Todos Web Application
After=network.target

[Service]
User=ubuntu
WorkingDirectory=/home/ubuntu/flask-todos
Environment="PATH=/home/ubuntu/flask-todos/venv/bin"
ExecStart=/home/ubuntu/flask-todos/venv/bin/gunicorn --workers 1 --bind unix:flask-todos.sock -m 007 wsgi:app

[Install]
WantedBy=multi-user.target
Then, run the following commands to start and enable the service:
# Start the service
$ sudo systemctl start flask-todos

# Check the status of the service
$ sudo systemctl status flask-todos # should be active (running)

# Enable the service to start up at boot
$ sudo systemctl enable flask-todos
Next, open the flask-todos file in the sites-available directory and
change the proxy_pass value to unix:/home/ubuntu/flask-todos/flask-todos.sock;:
server {
	listen 80;
	listen [::];

	server_name xyz.compute-1.amazonaws.com;

	location / {
		proxy_pass http://unix:/home/ubuntu/flask-todos/flask-todos.sock;
		proxy_set_header X-Forwarded-For $proxy_add_x_forwarded_for;
		proxy_set_header X-Forwarded-Proto $scheme;
		proxy_set_header X-Forwarded-Host $host;
		proxy_set_header X-Forwarded-Prefix /;
		proxy_redirect off;
	}
}
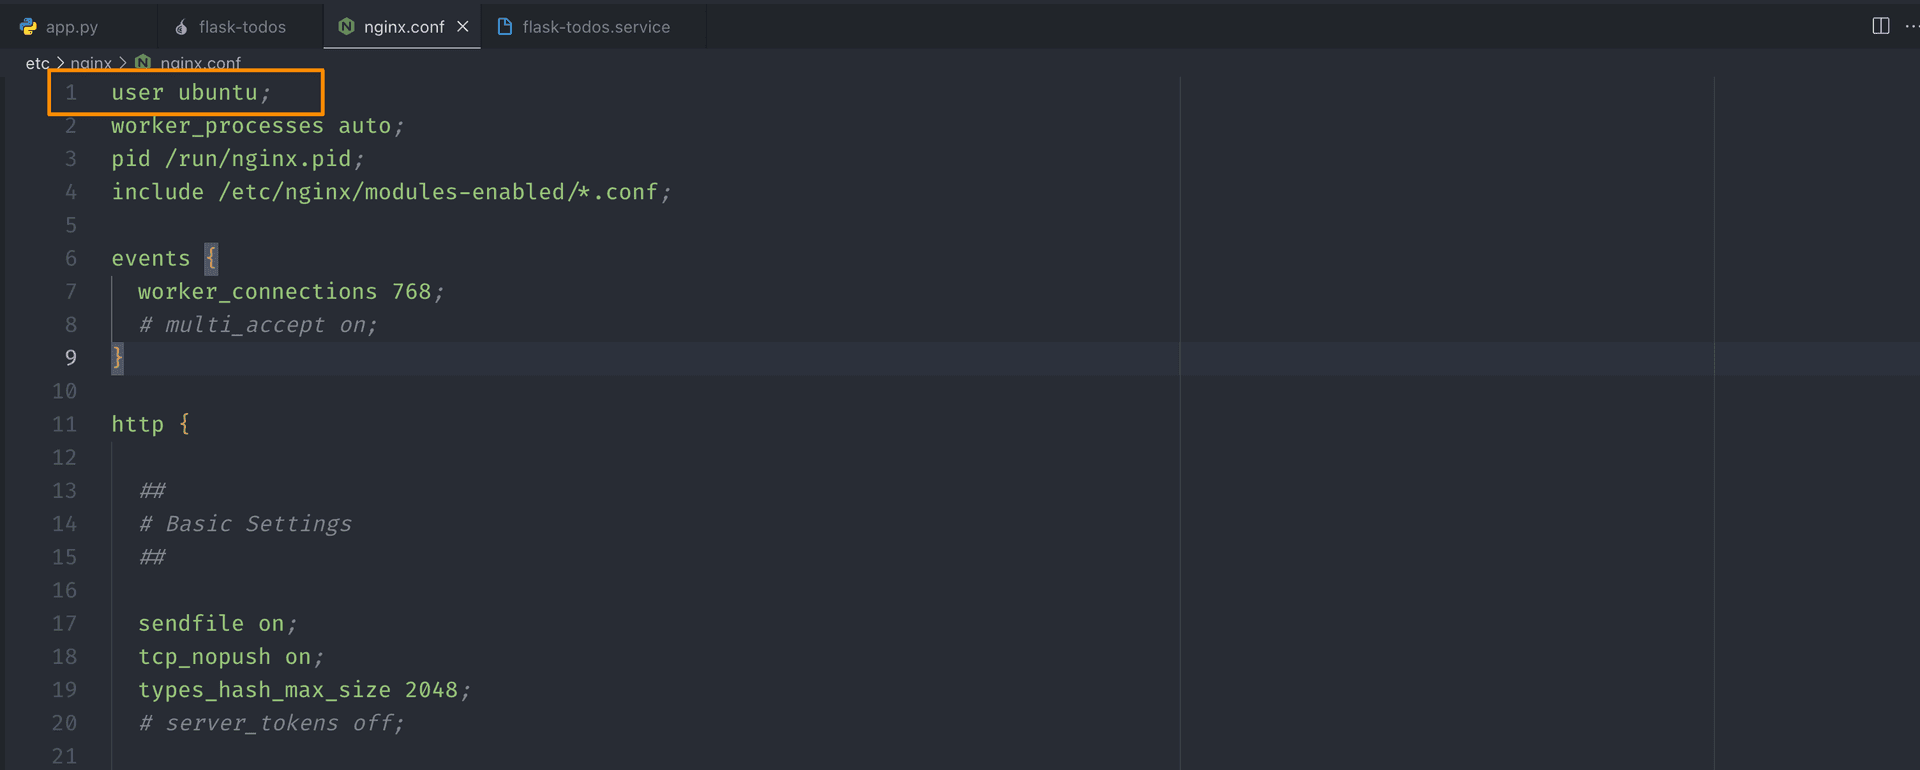
Next, run the command code /etc/nginx/nginx.conf to open the nginx.conf file and
replace the user value to ubuntu in Line 1.
Finally, run the following commands to restart the Nginx service:
# Make sure the configuration file is correct
$ sudo nginx -t

# Restart Nginx service
$ sudo systemctl restart nginx

# Check the status of Nginx service
$ sudo systemctl status nginx # should be active (running)
Now, you can close the terminal, and the application will still be running.